
Step 1: Install software, then restart
Open the 10.6 Snow Leopard folder on the CD (or download), then double click “Install”.
Then restart your Mac.
Step 2: Turn off internal Wi-Fi
If your Mac has a built-in Wi-Fi (AirPort) card, please turn it off while using BearExtender.

Step 3: Plug in BearExtender
Connect the USB cable directly to your Mac.
Macintosh desktop users: do not use the low power USB ports on the keyboard.
If you see a message about loading an extension, click OK. This message will only appear once.
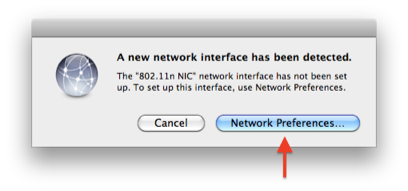
Step 4: Click Network Preferences
A message may appear asking you to confirm adding BearExtender to your Mac in Network Preferences.
If you see this message, click the “Network Preferences” button.
This step only needs to be done once.
If you do not see this message, proceed to Step 6.
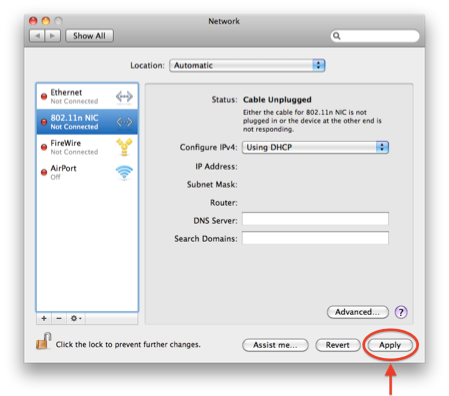
Step 5: Click “Apply”
802.11n NIC appears in the side bar. Click Apply.
Then close the Network Preferences window.
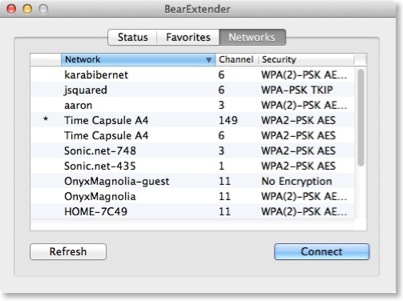
Step 6: Join a network from the BearExtender window
Select your network from the list and click “Connect”.
Once you are connected, you can close or minimize this window.
Use this window to scan and connect to networks in place of the AirPort (Wi-Fi) menu.
Do not quit the BearExtender application in the dock.
If the BearExtender application is closed, then BearExtender will be unable to open when the USB cable is plugged in.
You can always manually reopen the BearExtender window by double clicking “BearExtender” in your Applications folder.
Setup complete
BearExtender is now ready for use.
If you need help, please view the Troubleshooting page.
Learn more